Extractor tension gauge
The extractor is exerting side pressure toward the fixed
portion of the breech face. This is where the term extractor tension
comes from. Extractor tension is simply the amount of pressure being
exerted by the extractor on the case head. 25 to 28 ounces of tension is
a good working range for most semi-auto pistols.
As the pistol is fired, the case is held firmly against the
breech face until it moves far enough in the cycle to come in contact
with the extractor. The case is then pivoted around the extractor by the
ejector until it releases and is ejected from the pistol. If the case
is not held firmly by the extractor you will experience erratic ejection
performance or non-ejection.
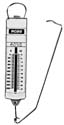
RCBS Trigger Pull Gauge |
FAILURE TO FEED
In most instances, an extractor that is adjusted too tightly
(too much extractor tension) will cause a failure to feed. In this
condition, the case head is not allowed to travel up, into the breech
face because the rim of the cartridge never becomes fully-seated under
the extractor hook.
Excessive extractor tension can also cause the extractor to
dig into the cartridge rim, which is made of brass. This will cause
inconsistent feeding or an intermittent feeding problem.
Refer to View “A”. This illustration shows the end of the
extractor as if you were looking at the breech face from the muzzle end
but it shows the extractor hook only. You will see on the left what the
majority of extractor hooks are machined like. We want to radius the
lower portion of the hook as shown in the illustration on the right.
This area, when left with a sharp transition, can dig into brass and
impede feeding.
The second problem area, View “B” is a view of the extractor
from the same vantage point with the hook removed. You will see a small
bevel where the case slides up the extractor face that usually has a
sharp intersection. I take a small needle file and radius this
intersection to smooth up the transition point.
When examining your brass you will find small dings on the
rim of your brass, this is the area of the extractor that causes it.
Similarly with the hook not being radiused you will find small dings in
the web of your brass.
FAILURE TO EXTRACT
Failures to extract are usually related to an extractor with
too little tension. With too little tension, the brass is not held
securely long enough in the cycle to be properly ejected. The brass is
allowed to loosely float around as the pistol cycles. The brass hits the
ejector in a non-uniform manner and ejection is very random. One case
may be tossed several feet, another case may just barely clear the edge
of the ejection port.
CHECKING AND SETTING EXTRACTOR TENSION
Many highly trained pistolsmiths can adjust extractors by
hand with a great deal of success. In my shop we try to employ a method
that is a little more scientific by identifying our unknowns. I try to
use procedures that produce consistent results. I like results that can
be measured (quantified) and later incorporated into other pistols I
intend to build in the future. This saves time for us and frustration
for the customer. Return shipping is quite expensive these days and
customer returns are something I try to avoid at all costs.
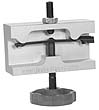 |
| Extractor Tensioning Tool |
I determine extractor tension using our Extractor Tension
Gauge Set (#957-101-000). The Set includes two, double-ended, brass
gauges that will work for 9mm/.38 Super, and .40 S&W/.45 ACP. To use
this tool you will also need a trigger pull gauge that reads in ounces.
I recommend the RCBS Trigger Pull Gauge (#747-094-500). That’s the
trigger pull gauge that I use in our shop and it works just fine. If you
really want to go upscale, Brownells offers four models of Recording
Trigger Pull Gauges that will not only show exact extractor tension but
record the tension with a telltale. The 6 lb. Model (#174-006-060) will
work best for measuring extractors.
First, install the extractor into the slide and retain the
extractor with the firing pin stop. Clamp the slide vertically in a
padded bench vise with the muzzle end pointing upward and the ejection
port facing you as you stand in front of the vise.
Insert the Extractor Tension Gauge for the appropriate
caliber between the extractor and the breech face directly where the
case head would set. Line up the hole in the gauge with the firing pin
hole. Attach a trigger pull gauge to the opposite end of the Extractor
Tension Gauge. Pull the trigger pull gauge toward you so the Extractor
Tension Gauge will be moved from between the extractor and the breech
face. Read the tension on the scale at the moment the Extractor Tension
Gauge begins to move toward you. The amount of pull required to move the
Extractor Tension Gauge, expressed in ounces, is your extractor
tension. Ideally, the tension should be between 25 to 28 ounces.
To adjust the amount of tension exerted by the extractor,
you can bend the body of the extractor to position the hook closer or
farther away from the side of the breechface. It can be bent using many
methods. You can use the extractor tunnel hole in the slide to capture
half of the extractor while you bend it with your hands. You can also
bend it with two pairs of pliers or secure one end of the extractor in a
vise.
Over the years I had problems controlling the amount of bend
when adjusting extractors by any of these methods. I would go through
the bend and unbend method several times until I got it just right. I
was quite time consuming.
I developed a new tool. It’s called the Extractor Tensioning
Tool (#957-000-037). It’s simply a hand arbor press used to precisely
bend the extractor while controlling the degree of bend.
The picture above shows the Extractor Tensioning Tool with a
1911 Auto extractor setting in the tool. If your extractor has an
insufficient amount of tension follow these directions. Adjust the Stop
Screw and Lock Nut until there’s an 1/8" of gap between the extractor
and the tip of the Stop Screw. Tighten the Thumb Knob on the bottom of
the tool until the extractor rests against the end of the Stop Screw.
Tightening the Thumb Screw bends the extractor body.
Reinstall the extractor into the slide and recheck the
extractor tension. If more tension is needed, remove the extractor from
the slide and repeat the adjustment sequence. To increase extractor
tension, adjust the Stop Screw outward an 1/8 of a turn and bend the
extractor again.
Continue the bend and check sequence until the proper
extractor tension is reached. Turning the Stop Screw an eighth of a turn
will usually produce from between 3 to 5 ounces of additional extractor
tension. All extractors will vary but this is a good starting point. If
your extractor is too tight (excessive extractor tension), I recommend
you bend out the extractor and repeat the process again.
The real advantage to using these tools is you get a
measurable starting point and a constant value to work with. Having the
constant value of known, extractor tension and a reliable, repeatable
method to change it, will help you solve extractor and feeding problems
quickly and accurately.
|


